Online Course Creation Formula
Overview
Congratulations on creating your online course! This is a huge opportunity to share your wisdom with the world in a way that is highly accessible to your “Learner” (customer/client) while empowering you as a “Coach” (online course facilitator / educator) to establish yourself as an “Expert” and create a scalable business with passive income.
We are honored that you have chosen to work with Wisdom Business Academy as your personal advisors for expert online course creation and that you will host your course on our intelligent.coach cloud-based learning management system (lovingly known as the “platform”).
Creating an online course is a masterful process that requires a bit of know-how. This Online Course Creation Formula document serves as a brief, basic guide to our “magic formula” for creating an online course that is effective, engaging, and showcases your message in the best possible way while optimizing your Learner’s experience so that they finish the course strong and get the maximum benefit. This of course leads to a strong community of Learners, raving fans who recommend your course to others.
If you purchased a Service Package with us that includes “course creation consulting hours” outlined in our Scope of Work Agreement, we will go over all of this in detail and our team will help you create and align your content with this magic formula.
Eventually, you will provide all your content to us to upload in your platform. This Online Course Asset Management document and checklist will be essential. You might just take a quick peak now so you know the big picture. If you are consulting with us we will walk you through it. If you bought a basic Service Package that does not include consulting hours, you will use this document as a self-guided process to provide all your course assets to us.
You may also find it useful to review What’s Included in intelligent.coach.
We are delighted to be of massive service to you as you are in massive service to your Learners.
Types of Online Courses
- Broad overview of your entire system of learning:
Example: The 7 Steps to Your Successful Wisdom Business – a more general survey of each of the 7 Steps of the Wisdom Business Academy model for creating an “information commerce” business.
- Deep dive into one of the aspects of your learning system:
Example: How to Build Your Online Course – this is a more in depth step-by-step instructional course on just 1 of the 7 Steps to Your Successful Wisdom Business.
- Preliminary intake process to educate and gather data before a 1-on-1 session:
Example: Offer a video-based intro to your work and “what to expect” guidance for the session.
Offer questionnaires so that you have all of their data stored digitally.
The benefit for you is that you do not have to repeat the same process for each of your clients.
The result is that your first 1-on-1 session can be more efficient and tactical, the client gets more bang for their buck.
- Sports or personal training system:
Example: Each day/week can offer a new “Lesson” with a specific training regime.
Learners can log their daily progress. You as the coach have instant access to their logs.
If the goal for your online course, or learning system, falls somewhere in between the type of online courses discussed (or any other creative idea), let’s discuss how to adapt the information in this document to create an optimized experience for both you and your Learners.
Timing of Delivery
Evergreen Course:
All course content is prerecorded. Anyone can login anytime and begin. This content can be released in 3 ways.
- Drip released in a linear fashion as a Learner progresses. As one Lesson/Module is completed, the next becomes available.
- Time released – ie 1 Lesson every 30 days
- Immediately available content allowing the Learner to jump around rather than progressing in a linear fashion through the content.
For ease, we recommend that you start with an Evergreen Course if this model fits your teaching content. It can easily be upgraded to a live class in the future.
Live Class:
A group of Learners start at the same time and progress through the content together, facilitated by you, via live streaming video right inside the course on the intelligent.coach platform.
Online Course Content
Are you ready to begin the creative process of designing your course content? Perhaps you are just getting started or maybe have already started the process or writing your online course. If you already have your thoughts on paper, we strongly recommend you adapt your existing content according to the Course Creation Formula as offered here in this document. We have had a lot of experience reviewing course content and, when it comes to implementation and Learner experience, this Formula is a great framework. So you will have some work ahead to create or adapt your content according to this Formula. It will really help you clarify your teaching process so that your Learner has an easy-to-use system to follow that offers information in a rhythmic style that nurtures their learning process.
{Note: If you already have a strong content writing format that you have used, let’s discuss before you begin adapting your content to this Formula.}
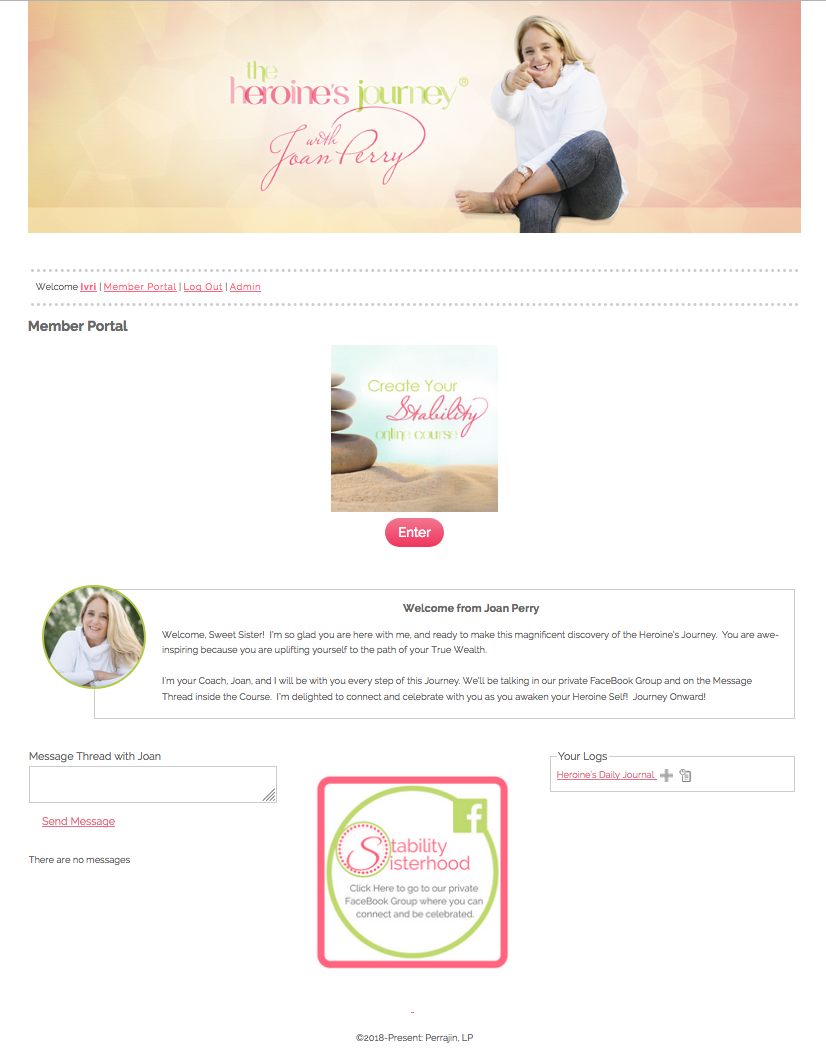
Member Portal
The Member Portal is what the Learner sees when they sign in to your online course. It is their way of navigating to what they need to access. Below is an example of a Member Portal. Yours can be a bit different. Once your online course is designed, we will design your Member Portal. It is just nice for you to see it now as you begin to image the form your unique online course is going to take.
Optional Components:
- Platform Banner
- Enter Course(s) thumbnail
- Welcome Address with your picture
- Message Thread directly with you, the Coach
- Thumbnail image link to your private Facebook group
- Journal widget
- Log widget
- Upload/Download Files widget for Learner files (if you assign such an activity)
Course Overview
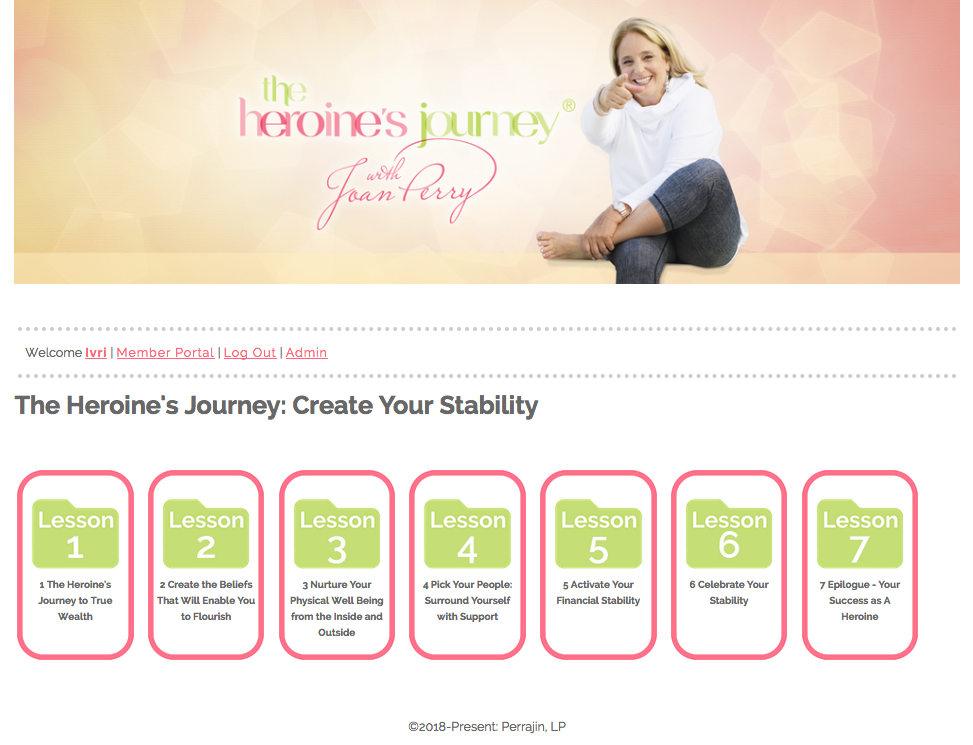
When your Learner clicks the Enter Course graphic/button they are directed to the Course Overview. This page is a graphic representation of all the LESSONS in your course. They click the Lesson “tile” image to be taken to that Lesson.
You can give a Learner access to all Lessons at once, or you can require that they complete a Lesson before progressing to the next Lesson. Once a Lesson is complete, a grey check mark will appear so the Learner can visualize their progress.
Lesson Overview
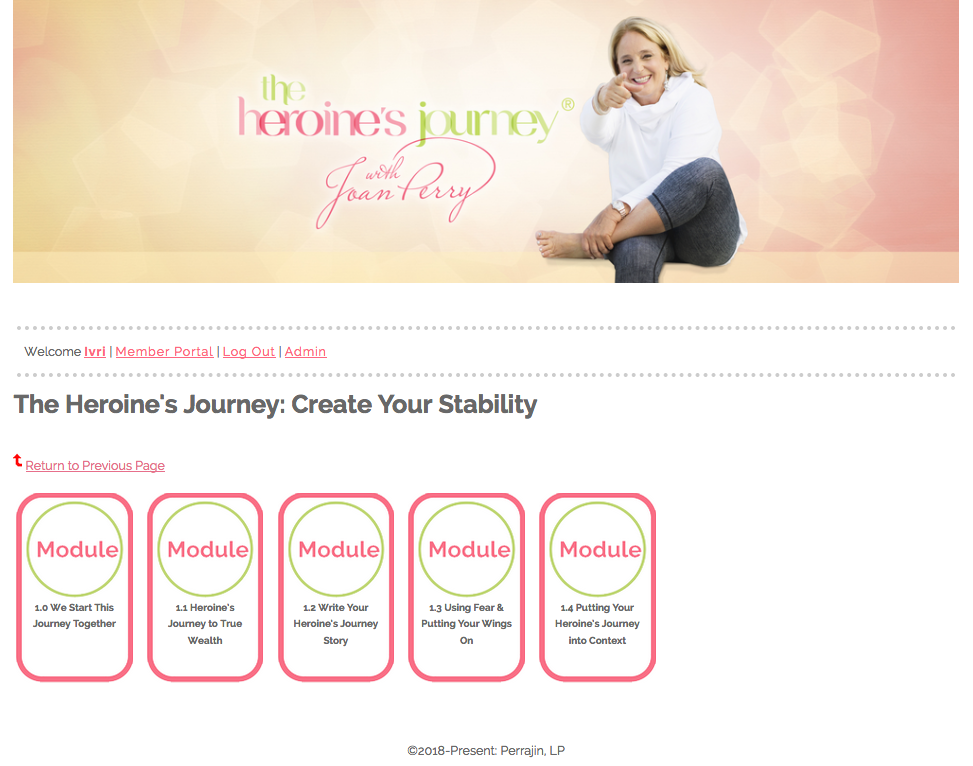
Once the Learner clicks the Lesson tile (mentioned above), they are taken to the Lesson Overview. This page is a graphic representation of all the MODULES in the specific Lesson. They click the Module “tile” image to be taken to that Module.
You can give a Learner access to all Modules in the Lesson at once, or you can require that they complete a Module before progressing to the next Module. Once a Module is complete, a grey check mark will appear so the Learner can visualize their progress.
The Anatomy of an Online Course
Now that you have had an overview of the general things to know about an online course, let’s get formulaic. Below is a “universal” structure for an online course that works well for taking a Learner through your system of education or transformational process. For most online course creators this is the framework that works the best. Of course, we are here to help you create a customized online course experience. We are happy to guide you on alternative options for delivery of your content via an online course.
Here is the universal formula we recommend (we will break down the components later in this document):
Lessons
Lessons are the main topics of your entire course.
Ideally your online course has 4 – 7 Lessons.
You may have more of less depending on your content.
Example:
Lesson 1: Step 1 – Manifest your Manifesto
Lesson 2: Step 2 – Formulate Your Wisdom System
Lesson 3: Step 3 – Deliver Your Message
Lesson 4: Step 4 – Wow ‘Em With Your Website
Lesson 5: Step 5 – Organize & Automate
Lesson 6: Step 6 – Mobilize Your Movement
Lesson 7: Step 7 – Magnetize Your Movement
Modules
Modules are the main topics (Lessons) broken down into digestible pieces of learning content with Exercises and Resources to support the Learner’s understanding and success. Generally a Lesson contains 3-5 robust Modules (maybe more depending on the purpose of your course).
Example:
Lesson 1: Step 1 – Manifest your Manifesto
Module 1.1: Identify Your Vision
Module 1.2: Write Your Plan
Module 1.3: Time Table for Manifestation
Table of Contents
As you begin the course writing process, we recommend you start with a Table of Contents – it will be the “map” for the Anatomy of your Online Course. At first, it will serve as a basic outline for your writing process. Later (after you refine and update it) it will be an important organizational tool for loading your online course onto the intelligent.coach platform.
- Create a Table of Contents in Google Docs (if you are working with us to refine your course content). Later, you will submit the FINAL version of the Table of Contents to us in a Word Document.
- Ensure that the entire structure and order of your online course is properly outlined.
- Ensure that each Lesson and Module Title is formatted and spelled correctly.
EXAMPLE TABLE OF CONTENTS
Table of Contents
The Heroine’s Journey®
Lesson 1: The Heroine’s Journey to True Wealth
Module 1.0: We Start This Journey Together
Module 1.1: The Heroine’s Journey
Action Step 1.1: Take a Step According to Your Road Map
Module 1.2: Write Your Heroine’s Journey Story
Module 1.3: Using Fear and Preparing To Put Your Wings On
Module 1.4: The Heroine’s Journey in the Context of Your Life
Lesson 2: Choose the Beliefs that Will Lift You into Flight
Module 2.0: I Am the Heroine of My Destiny
Module 2.1: What Are My Beliefs?
Module 2.2: Choosing Beliefs That Work
Action Step: 2.2: Share Your New Beliefs
Module 2.3: Your ‘Lighthouse,’ Supporting Your Beliefs
Module 2.4: Your Heroine’s Proclamation
Lesson Building Formula
Remember, a Lesson is the umbrella under which your learning Modules are housed. It identifies the main theme of the Modules within it. A Lesson “page” can be very succinct. It can simply introduce what will be covered in the several Modules for this Lesson.
Here is a good Lesson formula:
Video:
Adding a video on your Lesson page is optional. If you want to create a video, it can just be an inspirational and organizational overview of all of the Modules in this Lesson.
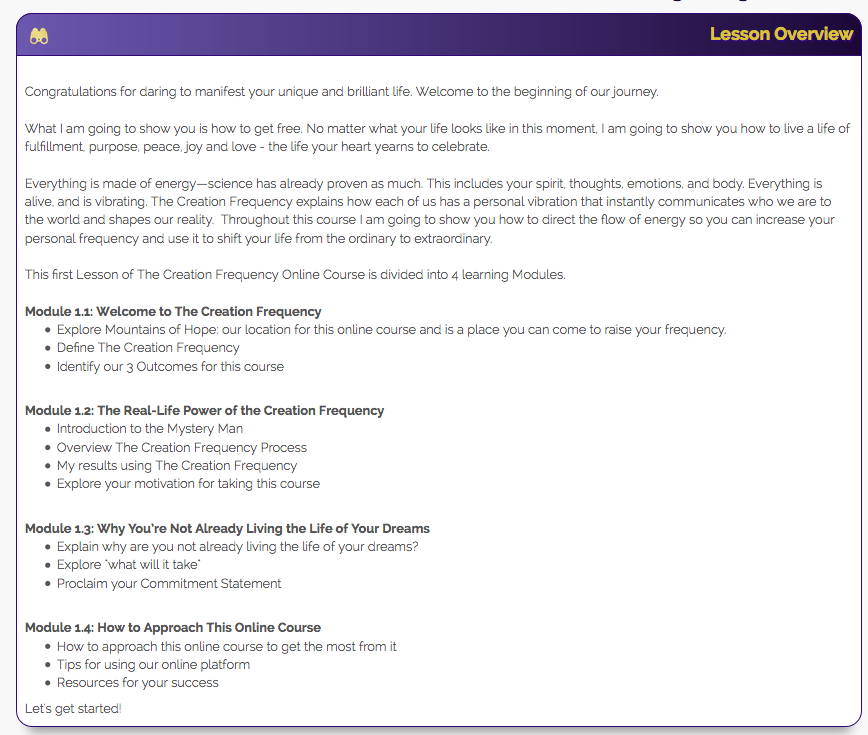
Lesson Overview:
A Lesson Overview is a written outline of the Lesson. The purpose is to:
- Welcome the Learner so they feel connected
- Make a “transformational promise” – what will the Learner get out of doing this Lesson. How will their life improve?
- Let’s the Learner know the scope/purpose of this entire Lesson
- Give a written overview of each Module
Example: Lesson 1 of The Creation Frequency by Mike Murphy
Module Building Formula
Modules are the repositories of your content. They are much more highly structured and interactive.
Let’s take a moment to understand the purpose of offering your content in smaller Modules.
- Small sections of easy to understand, related content
- Content delivered by you via video – to build trust, engagement and clarity.
- Takes about 10 – 30 minutes to complete
- Offers learning Resources to support Learner’s understanding and success
- Offers an “Exercise” where the Learner is asked to engage the content and apply it to their life
Module Format
Each Module, generally speaking, should have the same format. This allows your Learners to experience a rhythm in their learning and begin to build trust in the process.
A Brief Overview of the Module Format:
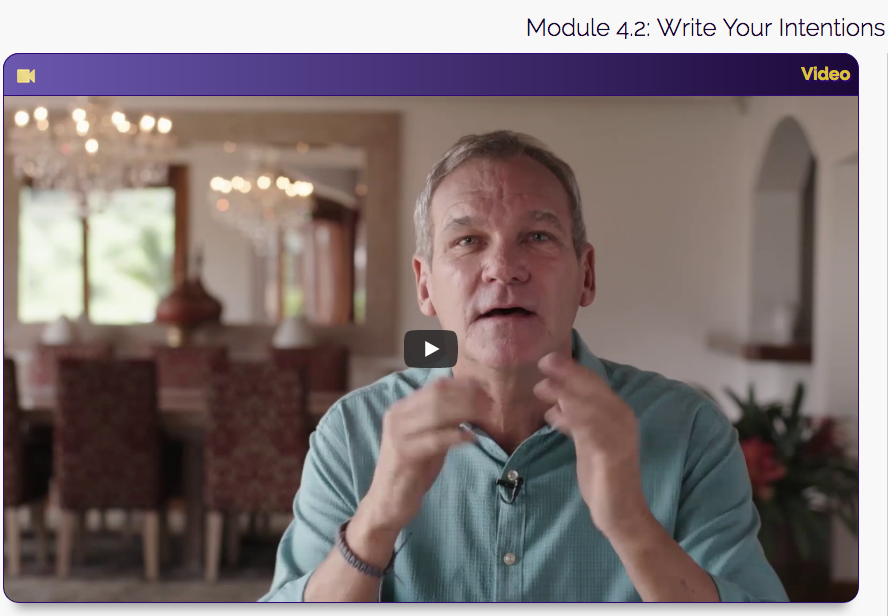
- Video
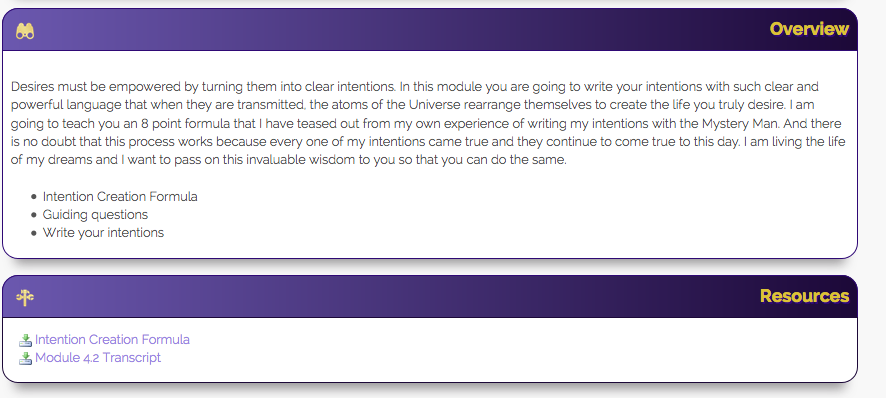
- Overview
- Resources
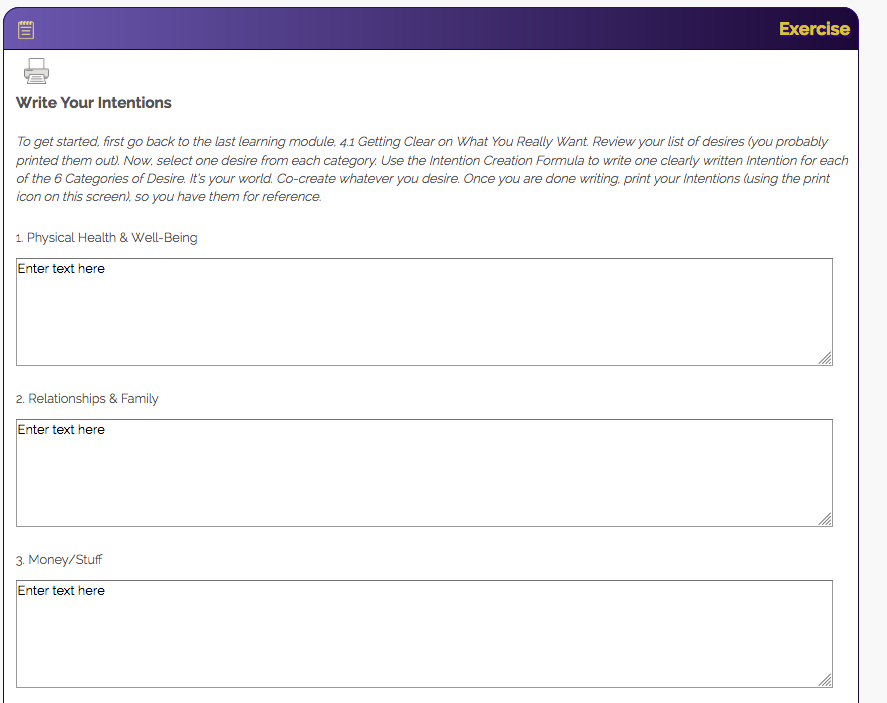
- Exercise
Example:
Here is what a Module “page” looks like in The Creation Frequency by Mike Murphy. It is the “page” inside intelligent.coach that presents all of the material for the Module.
Components of a Module
Module Component 1: Video
Video Purpose
Online courses that are taught primarily by video are the most engaging and effective. We recommend that you teach each Module in a single video {video format outlined below}. The video will be the top item on each Module page. In the video you are acting as a “coach.” You are guiding the Learner step-by-step through the entire learning process – offering encouragement, giving clear instructions on how to engage in the process, etc. When Learners see your face and hear your voice it activates their confidence in the process, builds trust in you as an expert, and engages them visually and auditorily. This is an important combo for understanding and retaining information for many Learners.
You will orate your entire course in the videos featured in each Module. There will not be any aspects of your online course that you do not say to the Learner in the videos. This way, everything is clearly shared with the Learner in the most effective way. There will also be written instructions provided where needed. But, primarily, it is all in the videos.
{Further down on the Module “page,” below the posted video, there will be “boxes” containing visual and written content that will support everything that you orate in the video. See the rest of the Module Format below.}
How to Create Your Videos
There are many details to producing a professional quality video (yes! Quality is important). Later we will consider filming equipment, lighting, set, costume, makeup, etc. For now let’s just consider the aspects of the filming process that will affect your preparation of the content.
Script: This is all the content that you will orate in the video – written out clearly using the Video Format {see below}. In order for a course to be succinct (no wandering off topic) and to ensure you remember to say everything that you want to say, most of our clients read their script to the camera using a teleprompter (directly over the lens of the camera). It may take several tries for it to seem natural, but it usually works very well. If you decide to use a teleprompter, then you can script your video verbatim.
Tips for Script Writing
Use friendly first person language in which you are speaking directly to your singular Learner. Make it highly conversational. Use turns of phrase that you would use speaking to your best friend. Create an engaging relationship with your Learner.
Pose rhetorical questions to you Learner. Ie “Now, that wasn’t too complex, was it? Are you ready to move on now?
Develop a lingo that is unique to your content. Define your lingo for you Learner then use it regularly so that your Learner feels like they are “part of the club.”
Take the role of “coach” and include encouraging statements and positive acknowledgement.
Sympathize with your Learner when you get to a challenging section of your teaching.
Be sure to use transitional sentences that lead from one section to the next. Ie, “Now that we have covered the first color of the rainbow, red, it is time to move on to the next color, orange.”
Talk to Camera
This is what we call the method of you sitting in front of the camera, looking in the lens (reading from the teleprompter if you choose) and saying everything you want to say (don’t worry we edit out the flubbs). The important thing to note is that you will say everything in one sitting so that the quality of sound is consistent throughout the video.
Video Images
After you record the entire video script, we can add imagery and title sides on the video that are visually imposed over your voice. Strong graphics, visuals and relevant text can really make the video more dynamic and make the teaching process more effective.
As you are writing your script make note of where you might want to insert a graphic or text over your voice. Indicate which graphic and be sure to create a digital file of all your graphics.
Intro – welcome and acknowledgement
Welcome & Acknowledge the Learners presence and what is special about them being here in this particular Module.
Transformational Promise – the high-level results of this module
State how Learner or Learner’s understanding will be improved after this Module. What will they ultimately achieve or realize? How will life change?
Overview – what is covered
List in bullet points what you’ll cover in this Module. Use engaging language.
Title slides should be used over the video sound track of your voice so Learner can read along with your voice.
Teaching – direct coaching / teaching to your Learner
Your teaching components for a Module may have 3 – 7 sections (think of these sections like headers in a written article)
Teach a specific section of your learning system. Don’t jump around. Be succinct and easy to understand.
Don’t cram too many concepts into one Module.
Teaching Modalities:
- Teach your system in a clear framework, using graphics to demonstrate.
- Feature Case Studies (real life stories)
- Consider adding a Visualization – Learner closes their eyes and follows your voice (use images over your voice on the video so if someone opens their eyes they do not see you – which can be distracting)
- Consider adding a “From My Desk” concept where you outline how this part of the process worked for you.
- Insert a relevant inspirational quote.
- What other ideas might you include to make your teaching system come alive for your Learner?
Resources – support tools for learning
Some of your Modules (but not all) may require the use of a “Resource(s).”
In the video explain what the Resource is, why you have included it and how the Learner should use it. {PDF Resources can easily be printed from inside Intelligent.coach}
Examples:
- Chart or image
- Template on which the Learner writes
- List or inspirational message for the Learner to post above their desk
- Link to a supplementary video of something interesting that supports your teaching ( get legal permission)
- Certificate of course completion
- Anything tangible that will help a Learner
Exercise – explain & give clear Instructions for the activity
Every Module should include an “Exercise.”
An Exercise gives the Learner an opportunity to actively engage with your teaching and put into practice what you have taught them. It takes the online course from passive learning to active engagement.
The written content that the Learner contributes in the Exercise is available to post inside your Learner Generated Manifesto (See below at the bottom of this document for introductory explanation).
In the video, explain the purpose of the Exercise.
Give instructions on how to complete the Exercise (precise instructions will be offered in the Exercise box below the video)
Offer “coaching” encouragement for the Learner’s process.
Remember, the Exercises are the places that the Learner enters “Learner generated content / data” into the system. Intelligent.coach collects this data for the final “Learner Generated Manifesto. {See above}
Examples:
- Self-survey – indicating on a 1-10 scale how they feel/what they know right now. Can be offered at the beginning and the end of the course to track progress.
- Multiple choice questionnaire
- A writing assignment to scribe their ideas / commitment / intention / goals / plans
- An activity with instruction to write a success/progress report inside the Exercise
- A journaling reflection on a Visualization, if you offered one
Coming Up – what we did & what’s next
First, this is a synopsis paragraph(s) that briefly reviews what they learned / accomplished in this Module.
Then, most importantly, give them a tantalizing sneak peak of what is coming in the next Module. Make them a promise. Inspire them to keep going.
At the end of this section remind them to complete the Exercise in this Module and you’ll see them soon in the next Module.
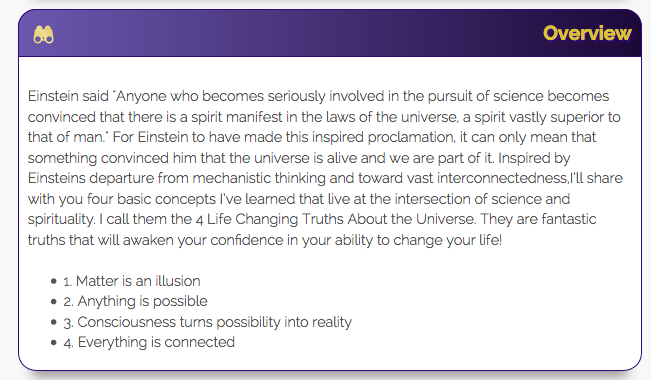
Module Component 2: Overview
The Overview is presented in written form on the Module page (see Module format above.) The purpose is to orient the Learner to what to expect.
- Offer a short summary paragraph describing what is in this Module.
- Write a bullet point Overview outline of the topics discussed (this can be the same outline as presented in your Video Script.)
Once the Learner has completed the course and is reviewing the course, the Overview helps them find specific content they are searching for.
Module Component 3: Resources
The Resource Box hosts the links to the learning Resources that you mentioned in the Video.
You can post downloadable PDFs, images, MP3 audio files, or links to video or other websites.
We also recommend you post a link to a PDF of a Transcript of the Video (for those who do better reading than watching).

Module Component 4: Exercise
This is the area in which you present the Exercise for the Learner. The Exercise serves two important functions. First, it ensures that your Learners are actively engaged in the learning process by interacting with your content and considering it’s impact on their life or skills-learning. An Exercise asks them to answer questions or write statements directly into the online course platform. If your questions have right vs wrong answers you can program that information into the Exercise and if your Learner gets the question wrong, the system will let them know what the correct answer is. However most Exercises are subjective and exist simply to engage the Learner with no right/wrong answers.
The second purpose for an Exercise is unique to intelligent.coach. The purpose is to collect “data” from your Learner. This data is simply the content they enter in the system as their answers. This data is used to automatically populate a what we call a “Learner Generated Document.” This could be a business plan, a life manifesto, a collection of poems that the Learner wrote as a result of your course. This Learner Generated document is very exciting. You can read all about it and see an example at the bottom of this document.
You already gave instructions in the video for how to complete the Exercise, but you need to format the Exercise properly in the online course platform so it is easy for your Learner to use. Create an Exercise title. Please add simple written instructions. There are many types of Exercises {see below}. If you have a creative idea for a unique Exercise, just ask and we will see what we can do to accommodate.
Here is an Example of structuring an Exercise with multiple types of Answer Fields. This is the format you will use when providing the final Exercise to use to load the content in your online course platform.
EXAMPLE EXERCISE
Title: Stability Questionnaire
Instructions:
We are starting with a Stability Assessment Questionnaire. It is a process to establish where you are right now in certain areas of your life. A metric of your current Stability. Below are a series of Questions. Please take your time to answer thoughtfully.
Content:
Rank your answer from 1-10: I experience Stability in my life.
{horizontal radio bubbles}
The state I lived in when I felt most stable was:
{drop down menu}
Check all that apply: I feel stable when I have a
Job
Partner
Car
House
Savings account
{check boxes}
How would you describe your desire for stability?
{long answer – multi line text box}
By what date do you want to experience Stability?
{date field}
Who most influences your stability?
{short answer – single line text field}
Below is a screen shot of an Exercise with answers that are {long answer – multi line text box}.

Module Component 5: Action Step {optional}
After the Learner finishes the Exercise, they click the Continue button to save the Exercise and progress. Consider not going directly to the next Module, but rather offering an assignment for the Learner to enrich their process outside of the online course. We call this “Action Steps” but you can rename it to suit your content. It is a call to action to do one thing outside the digital classroom related to what they just learned:
- Post their experience on your Facebook group
- Tape their vision board above their desk
- Hang 16 of their favorite inspirational phrases in each room of their house
- Have at least 3 daring conversations in the next week that make them more vulnerable
Below is an example of an Action Step that our client calls a “Journey Step.”

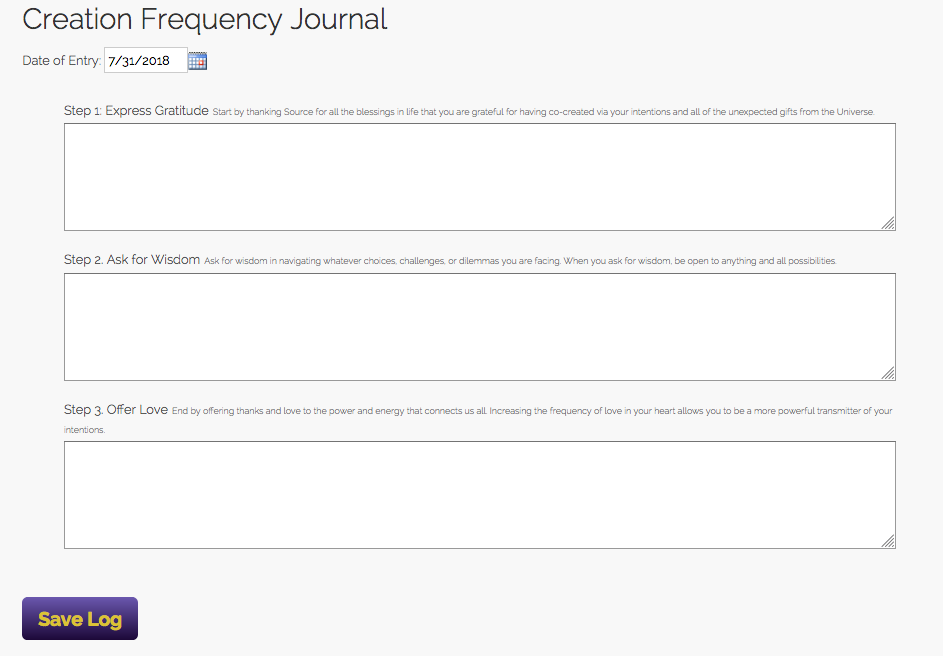
Module Component 5: Journal / Log {optional}
You may want your Learner to track their progress metrics regularly during the entire duration of the course. A Journal / Log is not specific to a specific Module, but you can post a link to the Journal /Log in each Module to encourage your Learner to complete it. {Journals / Logs are posted on the “Member Portal” – the Learner’s log in page. See above.}
If you ask them to use a daily / weekly log or journal process, be sure to teach this in one of your initial videos.
Some examples of a Log may be:
- weight upon waking
- food consumption list per meal
- number of reps of weight lifting
- minutes of meditation per day
- number and type of sales calls made
Example of Journals are:
- Specific daily journaling of 3 things you are grateful for
- Steam of Consciousness writing regarding the challenges on your Heroine’s Journey
Learner Generated Manifesto
What Is a Learner Generated Manifesto?
This is a very unique online course feature exclusive to the intelligent.coach wisdom-sharing platform. What we call a Learner Generated Manifesto (LGM) is a PDF document that the Learner downloads at the end of the online course. Essentially the LGM is a summary document of their learning experience written in their own words. Pretty cool, right?
Here’s How It Works:
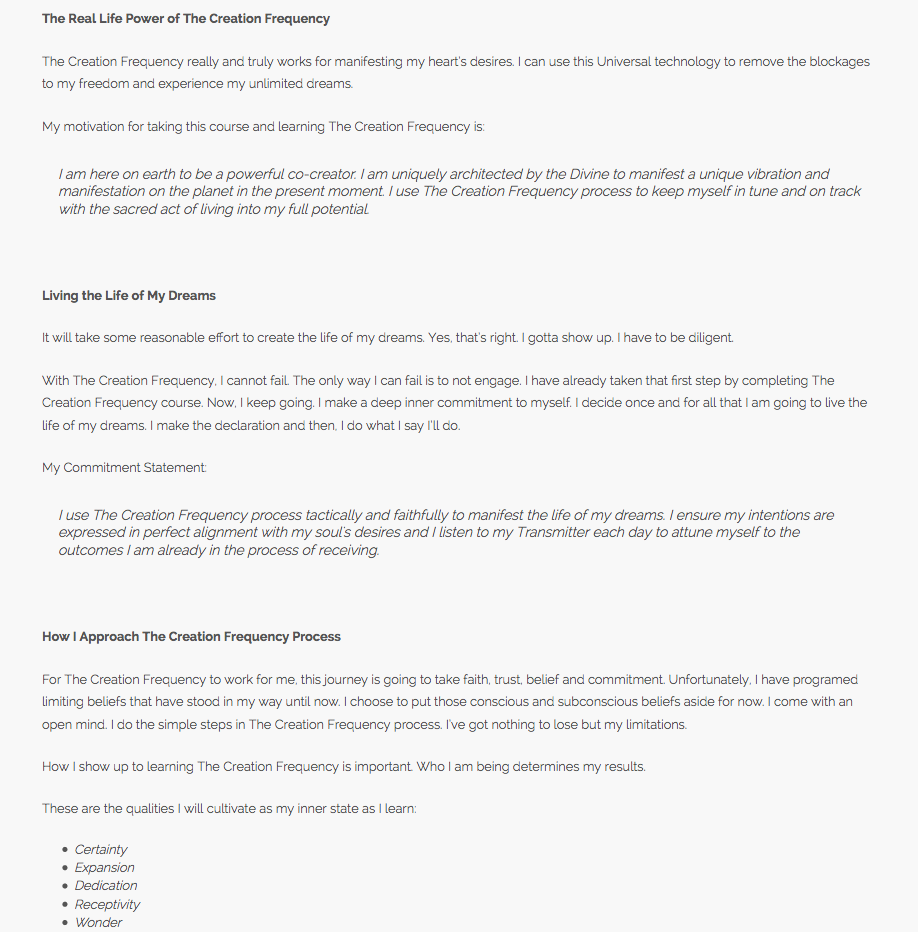
At the end of each learning Module on the online course the Learner is asked to complete an “Exercise” in the online classroom. The Learner’s written content (data) auto-magically populates into a LGM template that you, the Coach, creates – complete with supportive copy, graphics, tables, etc. The LGM is part template created by you and part content contributed by the Learner. In the excerpt below, the regular text is the template written by the online course facilitator and the italicized text is the content created by the Learner.
What Type of LGM Will You Create?
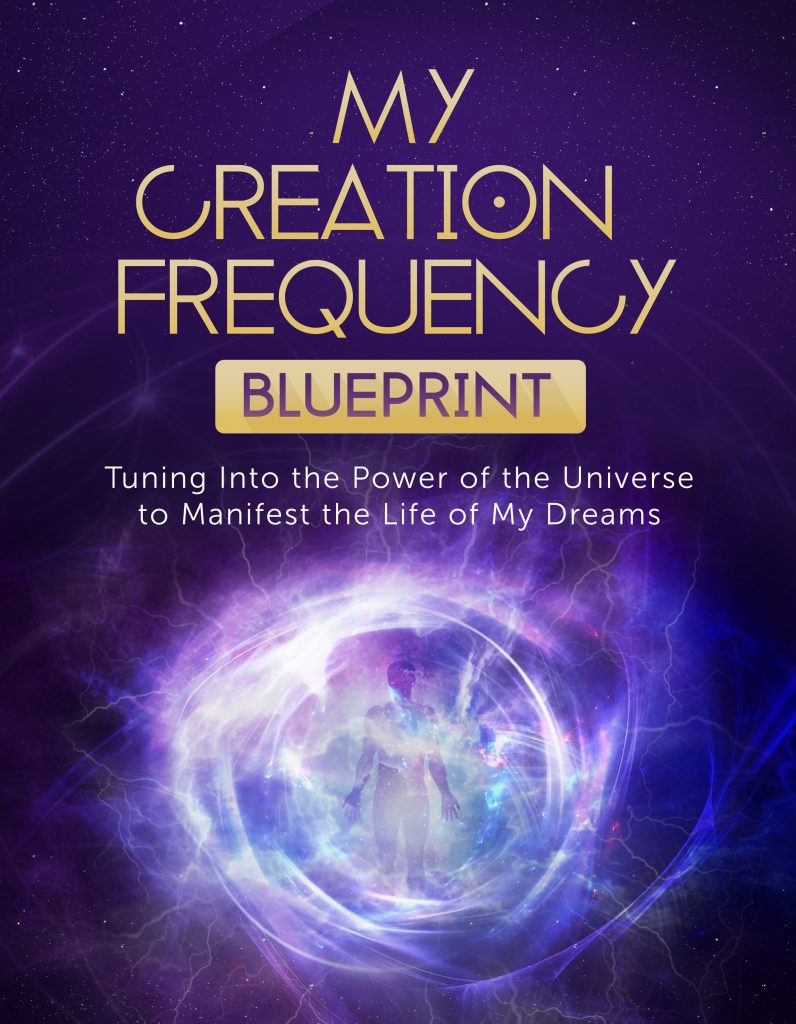
If you are a business coach, the LGM might take the shape of the Learner’s Annual Strategic Plan. If you are a relationship coach it might be a Personal Decree for Ecstatic Loving. If you are a Personal Development Author, the LGM may be titled: My Creation Frequency Blueprint (see example below).
Evolutionize Your Unique Selling Proposition!
Now you are not just selling an online course. You are offering your Learner the opportunity to create their own LGM which is a tangible self-created manual that will guide them in living the amazing results that you promise in your course. Now that’s impressive!
Sample Excerpt:
Conclusion
Well, that was the Online Course Creation Formula in a nutshell. We hope you found it helpful to get the ball rolling. It was a lot of information that may need greater clarification as you envision how to present your unique content / system as an online course. If you have purchased a Service Package with us that includes “consulting for online course creation” we highly suggest that we use at least one of those hours going over this formula and what your ideas are for presenting your content according to the formula before you begin writing your video scripts. It will make the whole process so much more enlightened and efficient. We are here to support you! So let’s get started.
Once you are advanced in developing your Online Course Assets (your content) according to this Course Creation Formula, please visit the Online Course Asset Management page. This will help you understand how you will present all your content (your “Assets”) in the FINAL format so that we can custom build your course on the intelligent.coach platform.
To Your Wisdom!
